Pages

Showing posts with label DIY INSPIRATION. Show all posts

Sunday, October 7, 2012

Tips: DIY Dolce & Gabanna inspired floral sunglasses


Dolce & Gabbana inspired DIY floral embellished sunglasses
It is a well-known fact that tutorials for the Dolce & Gabbana inspired DIY floral sunglasses have been done to death all over the Internet. So, instead of doing re-inventing the wheel, I thought of sharing some tips and some of the ideas that I have for this DIY project.

Tip #1: Pick a pair of sunglasses with thicker frame so that there is ample area for you to glue the flowers. A cat-eye frame is a plus because placing the flowers on the top tips of a cat-eye frame gives emphasis on the flowers.

Tip #2: Play around with placement of the flowers on the sunglasses using Blu-Tack to have a good idea of what the end-product will look like. This also allows you to wear the sunnies and decide if you actually like the look!

Tip #3: Use flowers of different sizes.

Tip #4: Try using metallic roses for a different look! 

Tip#5: Don't stop at flowers/roses. Think big, think fruits and animals. Think Anna Dello Russo's gold crocodile sunglasses. Now that's another DIY idea!


Half-frame floral look. Not a fan.
Tried a full floral look and decided it was too much for me

Gold roses
So there you go, my tips for creating your very own DIY embellished sunglasses. To be honest, I haven't glued the flowers to my sunnies. Those flowers are stuck to the sunnies with Blu-Tack. It's so hard to decide on the one that I really want! But I have to say that I have deviating towards the one with the gold roses! 

Have fun! xx

Saturday, April 21, 2012

DIY Inspiration: Neon Knitwear

Neon green yarn
I have to say that this is the brightest idea ever. Literally. 


Actually, the idea to make a knitted neon jumper came to me when I saw a local shop selling (cheap) neon green yarn. I don't think I've ever come across neon yarn before! Since I've been looking for a neon jumper, why not knit one myself? 
(via)
This knitted jumper from Topshop is the ideal shape and design that I want for my jumper. I shall start sourcing for a good pattern for knitting my neon jumper.


And yes, I use cheap yarn. 


x

Sunday, February 26, 2012

DIY INSPIRATION: ASOS Hand Knit Stripe Collar

via
via
These pictures of the knitted striped collar from ASOS have been sitting on my Pinterest board for a while, and I still haven't quite decided if I want to make it. I like how this knitted collar can serve the purpose of jazzing up a simple outfit while keeping my neck warm during winter. However, for some reason, I have this feeling that I might not like it as much after making it. 


For now, this will probably stay right at the bottom of my to-knit list. But for people who want to cast on right away, you can make your own using the free pattern available on Martha Stewart's website here.

For people who want to learn to knit, check out this website. I learnt to knit by watching the videos there.

Sunday, February 5, 2012

DIY INSPIRATION: Jimmy Choo's Coffee Sleeve


I don't drink coffee, but I can't leave home without a cup of Twinings tea in my re-usable coffee mug on days when I have classes in Uni. I'm honestly very tempted to make a similar coffee sleeve using some of the snakeskin fabric that I have leftover from this project. The best thing is, it'll probably take less than 5 mins with the cutting the and sewing!

Image of Jimmy Choo's Coffee Sleeves via here
Image of inspiration board created using Polyvore and can be seen here

Monday, December 19, 2011

DIY: Chanel-inspired ballet flats


This DIY project really makes me want to LOL. I don't usually type LOL on the internet, but this time, I really have to because it's exactly what I was doing while working on this DIY project.


I bought this pair of nude/beige ballet flats at an outlet shop for just $2 yesterday. Yes, $2, just $2! I was really lucky because this was the last pair for my size! But, when I tried it on, it was TOO PLAIN for my liking and I decided to do a DIY with it. For some reason, the image of the classic Chanel two-tone ballet flats immediately came to my mind. So, I grabbed some sticky tape and my trusty black Sharpie, and this baby was completed in less than half an hour.
I wouldn't normally DIY a pair of shoes because, let's face it - they wear out and they are NOT CHEAP. But hey, this pair of flats only cost me $2 and the DIY is as easy as doing 'Colour By Numbers'. So, with nothing to lose, I took a leap of faith and got on to put my idea into action (which, by the way, is something I should do a lot more often).

I'm not sure if it's the (shameless) idea of the project itself, my courage to do something like this, or the smell from my black Sharpie, but I was literally giggling to myself while making this. So, I hope you'll have fun too!


Materials:
1 pair of beige/nude flats
Black Sharpie
Sticky tape
Nude/beige ribbon (optional)


Steps:
1. First and foremost, test an area of the shoe with the black Sharpie. I know Sharpie is supposed to work on  virtually all surfaces, but it's better to play it safe. I tested my Sharpie on the under side of the flats to make sure that the ink comes out really black and stays permanent when dried!


2. Put sticky tape at the back of the flats as shown in the picture and colour the strip at the back with your black Sharpie. Do this for both flats.


3. Put sticky tape across the front of the flats, and make sure that both left and right side matches!! Then, colour the top of the flats with black Sharpie.


4. If your flats didn't come with a nude/beige bow, you can make one of your own and then stick it to the flats to complete the Chanel look. I was lucky that my shoes already came with the nude bows! :)

There you go. That's all. Wasn't that simple???


Also, I'm not sure about what you think, but my friend thought the shoes turned out looking like a Malayan Tapir...............................


P.S.: I wanted to post this later this week, but Polyvore stuffed my blog posts up when I was creating the inspiration poster on the website last night. So, bah, I decided to post it up today because I think some people might have seen the inspiration poster last night...


Image of the Chanel flats from here
Inspiration board created using my Polyvore account here
Image of the Malayan Tapir, which, by the way, is in the danger of extinction, is from here

Tuesday, September 27, 2011

DIY INSPIRATION: Studs and Skins

Studs and Skins

Studs and Skins by gwenstella

Here's the inspiration board for my most recent DIY project. I will be writing a blog post about it soon. Stay tuned! ^_^


Hint: It has something to do with an envelope clutch and shiny studs.

Friday, September 9, 2011

DIY INSPIRATION: House of Holland's Granny Square Scarf

DIY INSPIRATION: House of Holland's Granny Square Scarf
(via)


I have never tried making a granny square because I was never able to decide on what I want to create with those granny squares. I thought of making a bag, a vest, a placemat... but oh boy, I never realised how good granny squares look as a scarf. I hate how runway shows and fashion designers make simple and possibly overlooked crochet items/knitwear look so chic.


I did a quick search for patterns to make granny square scarves on Ravelry and found this and this to be highly similar in terms of design. If you have never made a granny square and are not quite sure how to, there's a comprehensive tutorial with videos here.


Now I am itching to make a granny square scarf... What about you?


To view the complete collection by House of Holland, visit their website here.

Saturday, August 27, 2011

Sunday, August 7, 2011

DIY: Flowers in your hair (Part 1)

DIY INSPIRATION: Flowers in your head


Hello my lovely readers! :) I've been in a really good mood lately because the weather has been really great over here in Sydney. The winter chills are slowly fading away, and spring is finally in the air! But I guess the majority of you who are reading this is on the other side of the globe, where summer is turning into fall. Well, that's all right, because this DIY project is perfect for spring AND fall! ^_^


So, without further ado, here's the how-to:


Materials:
1 x hair comb
Several mini flowers (You can get these flowers from most craft shops. They sell them in a bunch!)


Steps:
1. Gather your materials


2. Begin from one of the ends of the hair comb. Get one flower and wrap the wire stalk around the bottom of the comb.


3. The back will look like this as you continue to wrap more flowers around the bottom.


4. Continue with more flowers.


5. Continue until the bottom of the comb is completely covered with flowers! :)


So there you go, a simple way to add flowers/floral accents to your everyday outfits. I have ONE SINGLE STALK left from this project, so I'll be writing another post on another way to put flowers in your hair! Stay tuned!

Wednesday, August 3, 2011

DIY INSPIRATION: Dolce & Gabbana's Crochet Bag with Gold Charms


(via)

I saw a picture of this Dolce & Gabbana bag on my Tumblr dashboard a while ago and I have never been able to get it out of my head. I want it so badly, I will make one myself. But that's only AFTER I have made a hat for my friend's very belated birthday present and a cowl for another friend who is going away to Germany for a study exchange. On an additional note, I am moving out of my current place this month and I will be busy with packing. I will probably sound crazy for saying this, but I like it when I get busy. :)

Oh, and I made the collage above (i.e. the first picture) using my Polyvore account. I'm beginning to enjoy using Polyvore to make collages to document my DIY ideas. I guess that's the next best thing since I don't have a good program like Photoshop. Also, that saves me the hassle of linking all the sources to the pictures (because all the sources are listed at the side of the page when you view the collage on Polyvore). 

I hope I will be able start making/ finish this bag by the end of the year! All right, that's all for now. I have to prepare my uni classes for tomorrow now! x

Monday, August 23, 2010

United Colors of Benetton Chain Scarf

All images from nitrolicious
I know this Chain Scarf was out a long time ago. It has been on my to-do list for an awfully long time too. And I still want it. I'm not too sure how much it is. I'm not even sure if they are still selling it! But it doesn't matter, because it's definitely more than $20 and I can make it myself in my own favourite colour for less than $10!


So, do you want it as well? Can you knit? my day-to-day adventures has a great tutorial on how to knit one of these scarves yourself. LOVE!


Can't knit but can crochet? Cornflower Blue has a tutorial on how to make similar chains using the crochet method. But it's going to look slightly different because the original Benetton scarves were knitted.


I should seriously start a real, tangible to-do list instead of thinking about it in my head. 

Tuesday, August 17, 2010

IDEA: Cut your dresses

Is it just me or are fashionable dresses getting increasingly simple and easy to replicate with a few simple snips of the scissors?


All images are from Style Break

Sunday, March 21, 2010

From the streets of Bangkok - 6

This is the last post of the series, "From the streets of Bangkok"! It's been great sharing all these neat stuff that I saw during my trip to Bangkok earlier this year. I hope all of you have been inspired! (^_^)
I think this is easy to make! 
Step 1: Just grab one of your fabric belts and sew the sides together, with the right side facing each other. 
Step 2: Then turn it inside out so that the right side of the fabric is facing you.
Step 3: Tie a knot at one end, leaving a short length of tail (as see at the back of the necklace in the picture).
Step 4: Alternate between putting a wooden bead into the sewn fabric and threading the fabric through the wooden bead.
Step 5: Continue until you are satisfied with the length, then tie a knot again!
Step 6: Don't forget to finish off by sewing the two open ends of the fabric strip for a neat finish!

Sunday, March 7, 2010

From the streets of Bangkok - 4

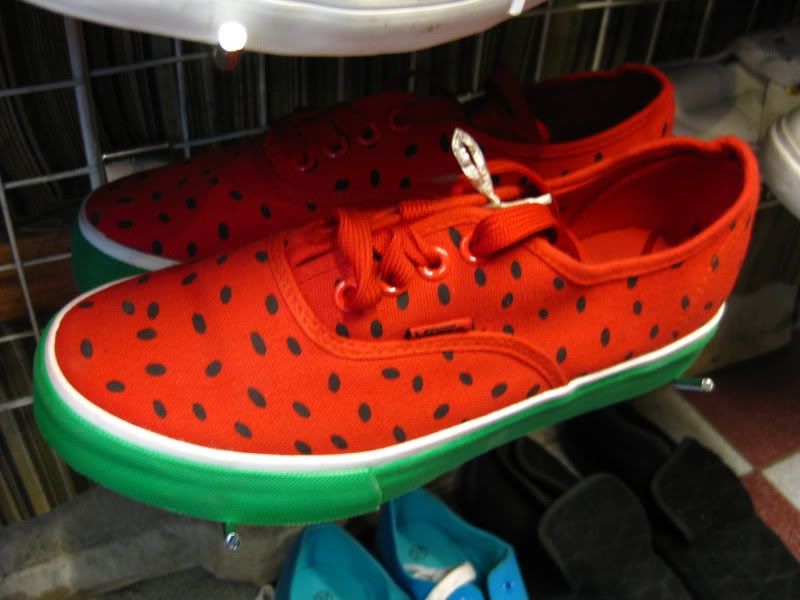
Painted sneakers!? Nah! They are printed ones. Ok, so this is not exactly something made by the artists of Bangkok, but I thought that it's actually a really good idea for painting your own white shoes! I'm not too sure why, but the idea of wearing something that looks like a watermelon on your feet seems to be rather popular. A quick google led me to several links tutorials on how to paint your own watermelon sneakers. 

Watermelon sneakers in Bangkok, around 250 Baht before bargaining.

Oh, and not forgetting how Vans also have their own version of the watermelon plimsolls!
So, if watermelon is your favourite fruit... you can add this project to your DIY list. It can't be too difficult. Just paint the sides of the gum soles green, the canvas body red, and finally add little black dots all around the red body. 

Friday, March 5, 2010

From the streets of Bangkok - 3

First of all, I apologise for this very late post. It has been more than a week since my last post. I've just moved to a new place in Australia (where I am studying) and it takes forever for the new Internet to set up. Damn.

PAINTED SNEAKERS! These designs on these hand-painted pictures look as though they were printed on. But no, you can be absolutely sure that are indeed hand-painted because the artists were just sitting right there painting other shoes! They were spotted in a corner of the Chactuchak Market and there were so many designs to choose from! I was really tempted to get one for myself but I have already overspent for that day.
I wasn't too sure about the prices of each design but apparently the prices start from 260 Baht.

If you were to ask me if I regret NOT getting one of these pairs of lovely shoes, I'd say no. It mostly because I have always felt that DIY items have a much greater sentimental value when it is made on your own or given as a gift from someone. It's just a personal thing. Nevertheless, I still feel that this is a great inspiration for people who plans to paint their own plain ol' sneakers.  
Check out the designs that they have! I really like the one with Spongebob's big smiley face (centre, left) and the one with the big heart between Mickey and Minnie (bottom, right ). Start your sketch on a paper now and start painting soon!

Tuesday, February 23, 2010

From the streets of Bangkok - 2

 Check out what the folks in Bangkok have been doing with aluminium drink cans! Cans that were once considered junk once it has served its purpose have now become these colourful, intricately crafted souvenirs.

They have made tuk-tuks, motorcycles and even alarm-clocks (that look like a drink can monster) out of the unassuming drink can. Who would have thought of that!

So the next time before you chuck out the drink can that you have just emptied, stop for a moment and think of all the things this drink can could have been.

Tuesday, February 16, 2010

Clay food is so cute

During my trip to Bangkok I bought some tiny clay food figurines. I got them at a shop on the 3rd floor in MBK shopping centre at only 5 Baht each! The moment I set my eyes on them, I knew that I want to make them into adorable ear studs!!!
Therefore, I took out my trusty E6000 glue, metal ear studs and started gluing away... These are my precious new studs in the drying process. I'm gonna give them away to my friends! <3

Check out their website!