Hello all, I am really sorry about the lack of posts this week! I actually have so much to show you guys this week. But there has been some problems with our phone connection which has implicated our internet connection. I am currently writing this post at the public library... (-_-x)
I really hope that the internet connection will be up again by next week! I have a knitted shawl, a painted tee, a clay project and another refashioned tee tutorial to show all of you! Stay tuned and have a grrreat weekend!
Fingers crossed. (^_^)

Saturday, July 24, 2010
Tuesday, July 20, 2010
I Write Like... Cory Doctorow

So they say. Of course I didn't simply copy and paste one example of my writing! I actually used several of my recent blog posts on my personal blog. This is the result that recurred for the greatest number of time, amongst other strong contenders such as Stephen King and Vladimir Nabokov. So considering the average, this should be the answer.
Maybe I should start looking up on this author and read one of his books. Frankly speaking, I have never heard of him.
(It's actually kind of freaky because I tried analysing the paragraph above and I got the same response, Cory Doctorow!!!)
Find out who you write like over here!
Friday, July 16, 2010
DIY: Rosette and Lace - Refashioned Tee

I've been thinking of doing a simple refashion project for a long time. Then something happened and I HAD to do it. No prizes for guessing what it is because I'm going to show you the pictures of the rather unfortunate incident.


What is done, is done. So I simply cut the strip, gathered a few beads, a section of lace ... and got this after less than 30 minutes.

So, if your washing machine is also an angry, tank-ripping machine, come follow the steps and create your own refashioned Rosette and Lace Tee!
Materials:
Plain top
1 strip of t-shirt
Pearl and clear beads
Lace
Sewing needle and thread
Steps:
NOTE: You may want to practice the steps and see if you like how your rosette looks before attempting to sew it into position.

1. Cut the bottom of your tee (the hem) to yield a 36cm strip. You can use a longer strip to make a bigger flower or a shorter one to make a smaller flower.


There you have it, a t-shirt flower with lace as its leave. (^_^)
Hope you like it!
P.S.: Ok, so you may be thinking that I still have the rest of the tank that I have not cut and used... Well, I'm keeping them at the moment and waiting to see what comes to my mind. I don't want to waste an inch of the tank!!!
Monday, July 12, 2010
FO: Doris Day Scarf
Warning: This post contains pictures of a scarf made using a yarn of such bright colour that it may potentially harm your eyes!

Hello everyone, how was the weekend? I've been making so many things in this holiday, I don't think that I will have the time to write about all of them on the blog on time! I'll just do one thing at a time from now on...
This is a crochet Doris Day scarf made using 100% acrylic Marvel 8 ply yarn in SHOCKING PINK. A definite head-turner and attention-seeker. I saw the free pattern on Vickie Howell's blog and finished it in a single day. Yes, one single day! If I want to be more specific, it would be 2 movies and 2 replays of my favourite mix-tape containing the greatest 1950s hits. Of course I had breaks in between...

But I have to say that I am not as happy with this as I am with my Mega-Cable scarf. The acrylic yarn made the scarf rather stiff. It doesn't look like the soft and bouncy scarf that the model in the pattern is wearing at all. Perhaps it is my fault for not using a 100% silk yarn as stated in the pattern. Damn. My fault for not being rich enough.


Nevertheless, I think that it'll still look good once it's matched with clothes that complement its colour and ruffles. I sure hope that the person receiving this will like it. :)

One last thing before I go, for people who may not know, Doris Day is actually an American actress who was around even before the time of coloured TV! I have never seen any of her movies or TV shows though. Maybe I should do that to get to know more about Vickie Howell's inspiration behind this scarf.

***

Hello everyone, how was the weekend? I've been making so many things in this holiday, I don't think that I will have the time to write about all of them on the blog on time! I'll just do one thing at a time from now on...
This is a crochet Doris Day scarf made using 100% acrylic Marvel 8 ply yarn in SHOCKING PINK. A definite head-turner and attention-seeker. I saw the free pattern on Vickie Howell's blog and finished it in a single day. Yes, one single day! If I want to be more specific, it would be 2 movies and 2 replays of my favourite mix-tape containing the greatest 1950s hits. Of course I had breaks in between...

A huge skein!
But I have to say that I am not as happy with this as I am with my Mega-Cable scarf. The acrylic yarn made the scarf rather stiff. It doesn't look like the soft and bouncy scarf that the model in the pattern is wearing at all. Perhaps it is my fault for not using a 100% silk yarn as stated in the pattern. Damn. My fault for not being rich enough.


Work in progress...
Nevertheless, I think that it'll still look good once it's matched with clothes that complement its colour and ruffles. I sure hope that the person receiving this will like it. :)

Ruffles
One last thing before I go, for people who may not know, Doris Day is actually an American actress who was around even before the time of coloured TV! I have never seen any of her movies or TV shows though. Maybe I should do that to get to know more about Vickie Howell's inspiration behind this scarf.

Doris Day Scarf by yours truly
Wednesday, July 7, 2010
DIY: Sequin Flower Hairpin/Bobby pin (pseudo-vintage/Victorian!)

Ooh, I just can't get enough of my new hairpin.
The iridescent quality of sequins makes it sparkle so much under the sun, it's hard to get a clear picture of it on my hair.
Ooh, and it's pseudo-vintage/Victorian! How can you not make one for yourself!?
MATERIALS
Sewing needle
Thread
20 x Sequins
10 x Seed beads
5 x Small plastic pearl beads
Glue
Felt
Scissors
Plain hairpin/bobby pin
STEPS

1. Thread a long piece of thread through the eye of a needle. Tie the 2 ends of the thread together into a knot.
Bring your needle and the thread through a piece of felt. This is the point where the middle of the flower lies.
Insert beads and sequins through the needle in this order:
1. small pearl bead
2. small seed bead
3. sequin with the concave side towards the eye of the needle
4. sequin with the convex side towards the eye of the needle
5. small seed bead
6. sequin with the concave side towards the eye of the needle
7. sequin with the convex side towards the eye of the needle

2. Insert the needle through the felt again. The point of insertion should be just a small distance away from the point of the middle of the flower.

3. Pull the thread all the way and make it tight. (BUT NOT TOO TIGHT!)
This is how your first petal should look like from the side.


4. Repeat the same for the subsequent petals.
You can make as many petals as you like. I like to have 5 petals because it makes it look like a sakura.

5. Tie a dead knot at the back of the flower.

6. Cut off the sequin flower from the piece of felt and trim the remaining felt such that the no felt can be seen when you see the flower from above.
Cut a small piece of felt and insert it between a plain hairpin/bobby pin. This piece of felt should be smaller than the back of the flower.

7. This is how your flower should look from the top! You shouldn't be able to see any of the felt.
If you find that your flower seems a bit floppy, you could fold the flower into half to reveal the felt at the centre of the flower. Then add a small dab of glue to the felt and push all the petals towards the centre again!
8. Use super glue (or whatever kind of adhesives that you are comfortable with) to stick the small piece of felt between the hairpin to the back of the flower.

Enjoy your lovely, new, pseudo-vintage hairpin!
Monday, July 5, 2010
DIY: Varsity Cardigan

That's me wearing my new Varsity Cardigan and my geeky glasses.
I was inspired by the many varsity cardigans that I have been seeing online lately. Also, I currently into geek fashion. Remember my Geeky glasses DIY and knitted Pencil Scarf? So I though of that plain, boring (and cheap) cardigan that has been lying in a lonely corner of my wardrobe, and decided to make varsity cardigan out of it!

Materials

1. Plain cardigan
2. Ribbon
3. Iron-on patches (you can use either numbers or letter!)
Note: The colours of the ribbon and the iron-on patches should be similar and complementary to the colour of your cardigan :)
Steps:

1. Get your cardigan and make sure it's clean.
2. Prepare your materials.
3. Cut your ribbon according to the diameter of the sleeves and pin them in position. You can position them according to your own liking, but I think it looks the best when it is placed near the armhole. You can also make 3 stripes instead of 2!
4. Fold the ribbon inwards to create a neat joint. I positioned the joint at the same place where the seam of the sleeves is for a neat finish.
5. Sew the ribbon along its 2 sides. I used black thread because my iron-on patches have black borders as well.
OR
Stick the ribbon in place using Heat N Bond! I wished I had some... but it's all right because the sewing actually gave the stripes an added effect as well. So it's really up to you.
6. Iron on the numbers/letters of the OTHER side of the cardigan. Hang your varsity cardigan up and admire it.
7. (OPTIONAL STEP) Watch Taylor Swift's 'You Belong to Me' MTV. It has a college-related theme too! HAHA.
Important note: The cardigan that I used had a loose fit, so the sleeves don't really stretch much when I am wearing it. If you are using a fitted cardigan, I advise that you use a stretchy ribbon because the ribbon limits the extent where the sleeves can stretch!
Wheee... I am looking forward to wearing my new varsity cardigan to school! (^_^)v


Sunday, July 4, 2010
Photo: Any Road

Any Road
There was a period of time when I was really inspired by this song. Go listen to the song if you've lost your direction in life. It doesn't give any answers, but it can sure make you feel better with its upbeat tune. (^_^)
Saturday, July 3, 2010
Link: Braided Bracelet Tutorial
I posted this link on my Tumblr craft blog and people are crazy over it. So I thought maybe I should put it here too. You can actually make this friendship bracelet look-alike using various different materials like fabric scraps, leather strands and even ... embroidery threads?
I'm totally gonna try this sometime.
What about you?
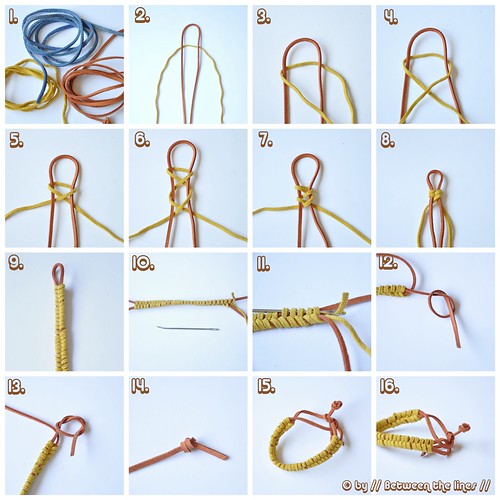
I'm totally gonna try this sometime.
What about you?
Image and tutorial from Between the lines.
Friday, July 2, 2010
FO: Put a Ring on It (Pearls and Diamonds Ring)
Oh oh oh, oh oh oh, oh oh... *humming Beyonce's hit song...


I finally got the chance to post pictures of this Pearls and Diamonds ring! I got the tiny ring pack from Spotlight quite a while ago. It was in the SALE basket and had a reduced price of $1!!! What a steal!!!

As you can see from the pictures above, the pack comes with everything you need to complete the ring. There are even instructions for it! But I personally think that the instructions are crap. Either that or I just couldn't do it accordingly. So I thought to myself, "Screw that, I'll just do it my own way." I'm glad that I did. I even have some beads left over! And of course I'm keeping them for possible future projects.
Sorry about all these blur pictures. There are 2 reasons for this. Firstly, I can't be very stable with my hand, especially when I could only use one of them since the other one is posing for the ring. I've tried taking pictures of the ring on my table, but the results are not great. The ring looks better on a finger. Secondly, it should be obvious that I edited the pictures to give it a soft focus and a more romantic feel. Blur = romantic. Something new eh?
Sorry about all these blur pictures. There are 2 reasons for this. Firstly, I can't be very stable with my hand, especially when I could only use one of them since the other one is posing for the ring. I've tried taking pictures of the ring on my table, but the results are not great. The ring looks better on a finger. Secondly, it should be obvious that I edited the pictures to give it a soft focus and a more romantic feel. Blur = romantic. Something new eh?

Most importantly, this post is reminder to all that contrary to what my blog title suggests, this is not a blog that is about knitting and knitting and... knitting. This is a craft blog and I write about anything and everything that I have made (^_^).
That's all for now. Winter is cold and I am already feeling sleepy... at 8.13pm. Bravo.
Thursday, July 1, 2010
FO: Oh Shivers, Keep Me Warm Scarf

Wheee...! It's been less than a week since my holidays started and I have finished a scarf! More importantly, this is the very very first time that I tried knitting cables! Oh dear oh dear, can you see me jumping as I am typing this? (And the song 'Forever Young' that is currently playing on my computer is also getting my heart pumping and fist punching.)
Enough of the nonsense. Let's talk about the scarf!
It's originally called the Mega Cabled Scarf and I got the free pattern from here. But because of the yarn that I used and the winter that is so cold right here in Sydney, I'm calling it the "Oh Shivers, Keep Me Warm Scarf". (And also because I am rather lame and I like interesting names.)


Talking about the pom poms! I have never seen and never made such massive pom poms. Trimming the pom poms really made my eyes water and my nose itch. I think I breathed in quite a bit of the fibres.

And this is the close-up of the gorgeous cables. I mean gorgeous in theory but perhaps not so much in this scarf since this is my first time trying cables. The cable stitch is one of the wonderful things that can be created with knitting.
Did I mention that I knitted this pattern without using any cables needles? Yeah, I have no cables needles with me but I do have many knitting needles of different sizes. I think you can imagine what I did. It was a mess but I got used to it as I went along. You could probably guess which end of the scarf is the one where I started knitting. It's the end with the wonky cable stitches...

Last but not least, this scarf is not for me! I made this for a friend of mine. Maybe I'll be able to post some pictures of her wearing it after I have given it to her. That will happen in a few months' time.
Subscribe to:
Posts (Atom)